Wednesday, 22 February 2012

Trees

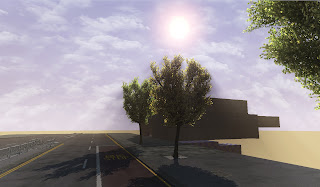
Added trees to line the street. One so far but I can make variations from it as the material is set up to add colour variation to the leafs. I remember the tree project from the first year and although it looked like a tree, I wanted to make some improvements. Things that I wanted to do was improve the normal map on the leaf branches. As this would help create more depth in the leafs when the light hit the canopy. I also new that it was important to have the normals on the canopy set up correctly but I was unsure how to go about it. After digging around the net for some help good old 3Dmotive.com came to the rescue with a tutorial dedicated to  creating grass and trees.

First step was to make High poly leafs. Seems a bit much to go to so much detail, but it was the only way to achieve the result I wanted.


Two variations of branches were made and then the leafs were attached to them. This job was made easier using the paint objects tool in Max. It was set up to randomly use the four leafs I had made and then as you painted onto the branches it would paint on the leafs. Because I had placed the pivot points at the base of the leafs it was easy to rotate and scale the leafs at then end. This stage was important because having leafs that were rotated towards the plane and away from it would create the best possible normals when the textures were baked from them.


The trunks and branches or the main tree were crated in the same way as when we did in the first year project. Splines were created and a master branch was then created and copies of that branch were then attached to the splines to follow them.


After crating the the Alpha planes for the branches it was important to scew the shape of then so that they could be seen from all angles. If they were flat planes, from the sides they wouldn't be seen and this would make the canopy look very thin and unrealistic. Small four side branches were made to attach the branch planes. I decided to crate two variations.


To create the canopy the branch clusters were then attached to the splines. This was done in the animation tab. With the pivot points properly aligned this made placing and rotation the clusters very easy. The best thing is I also plan to make variations of the trees and I can use this as a master tree. By just moving the splines around the large trunks and the leafs will follow them around.

The reason form making more trees would be to have variation in the silhouette as I plan to have a row of trees all the way down the street and it's important that all the trees look different.


The Normals for the canopy were corrected by using a script the comes with speed tree. This makes the normals project out in a sphere around the canopy. Then based around the shape of the canopy the centre point is moved into the correct place at the centre of the tree. This is important and the light will reflect properly when the tree is ingame. Shadows will be deep within the tree and highlights from the specular values will hit the silhouette of the leafs.


In order to get the trees to react properly with the wind it was important to get the vertex colours painted on the leafs. a gradient from black to red was painted so that the end would move with the wind and the branch at the bottom would stay stationary. Red was then used in the material editor so the material would know how the leafs would react to the wind editor.


For the wind portion of the material, sign nodes were used to create waves across the leafs to simulate the wind. This was then referred to the wind actor used in the scene to specify the direction and the strength of the wind.

Two sign networks were added together. One short and aggressive, and one long and smooth. this added more variation to make the effect more realistic. It's possible to add more to add further variation but I felt this was enough and I didn't feel it was necessary to add more instructions to the material.


Tuesday, 21 February 2012

Street Progress

Its been a wile since i last posted but I have still been working on getting the street area finished. 

Road

The road presented a few problems for me as I have been creating the material for it. After grabbing some really nice reference photos from of a bridge on the main road just past the New Walk museum, I still wanted to add some variation as this area will have some long stretches of road. The texture itself does not have any viable tiling but it still needed to be broken up.

Going back to what I had learned from the rooftop project when I used the tutorials from 3Dmotive.com to create the floor I have used a mix map again to add a tillable mask that is mixed with the grunge texture. What this does is allows you to use vertex painting to paint in areas of dirt onto the road with more variation around the edges, creating more variation with just he one texture.


One of the problems I was faced with was how to mix them together but use different specular levels on the grunge texture to the roads surface. The core of the problem was that I hadn't realised that in this case swapping the part of the material network that went into the A or B slots when combining the elements together with a multiply node had an effect on how the two textures were blended together.

After figuring this out this helped me to add other neat little things into the material. I was able to make a tarmac texture for the pavement by creating an instance of this material and setting up the main material with parameters to change things like the colour and spec. As it is an instance and not a complete new material it reduces the memory needed to render the level. Also as I am using the same textures I don't have to increase my texture budget with a separate texture saving even more memory. This was an expanded version of the colour change I had added previously used to create the bus lane. I also used switches in the material so that elements could be turned of in the instance. This is also good for performace as the switches actualy reduce the instructions in the material.
The road texture has worn areas from were it has been constantly drove over by vehicles. This was removed obviously from the pavement instance along with a subtle colour change to the tarmac and dirt.


Tree Bases

As I will be adding trees along the main road that runs along the front of the bank I have been looking out for metal surrounds. I finally found some outside the train station in Leicester.


After some heavy editing (removing lots a cigarette ends) this is the final result. I decided to make a mesh for this element as I wanted to have each quarter uneven to the others to have it look like the roots of the trees had moved them as the tree has grown. This was not possible with bump offsetting, so I just used that on the holes in the grates to make it look more three dimensional.


This last picture shows the other grates I have made that will be scattered along the road. These are decals and not meshes. I don't want to make to many as I cant use instanced materials with decals. I have to create individual materials for each one and as I am using allot of decals for the rest of the road decoration I need to make the least amount as possible. That said I can't think of any other way of doing it.


I've also been working on the police car that will be part of the blockade to prevent the player from leaving the playable area. It's modelled on a Volvo. I like to have something I can work on that is different to the the area I'm currently focusing on as it stops me going insane working on the same things.


Monday, 6 February 2012

Yellow Lines

Been looking at decals today. Decided this was probably the best way to go about adding lines to the edge of the road. I made 3 all together. One double, one single, and another that connects the two together. Need to go out and snap a shot of the bus lane writing and I'm also going to create some white lines from the yellow lines by desaturating them in the material. As you can see in the picture I have added vertex painting to the road texture so I can paint in the red colour of the area I'm going to make as the bus stop.


Thursday, 2 February 2012

Curbstones

decided to make some quicke high poly models of these. Both side have unuiqe details so i can flip them over and get 2 stones for the price of one. I made 3 long in total and 2 squiare. Just need to make a couple of 45o angles curves out of them. Will add to of them together to make 90o for the corners onto the street that will join the main road.


Wednesday, 1 February 2012

Road

Not finished yet but I have been working on the road texture. I want the street to feel a realistic as possible so I'm paying allot of attention to these materials to ensure they reassemble and look the same as in real life. I will do the same for the curbstones that I plan to make next.